
Automating HDR Photo Creation in Adobe Lightroom
Published:
Have you ever taken a photo of a breathtaking sunset, only to find the sky blown out or the foreground lost in shadows? This is a common limitation of digital photography — but HDR (High Dynamic Range) photography offers a powerful solution.
In this blog post, we’ll explore:
- What HDR photography is and how it works
- When HDR is helpful — and when it’s not
- The challenges of processing HDR images for large photo collections
- And finally, a method to automate HDR merging in Adobe Lightroom to simplify your workflow
If you’d prefer to skip straight to the automation solution, feel free to jump to the section: “The Automated Process for Merging HDR Photos in Adobe Lightroom”.
To set the stage, let’s first explore the core principles.
What is HDR?
HDR stands for High Dynamic Range, a photographic technique designed to overcome the limitations of digital sensors. It allows you to capture a wider range of brightness levels than a single exposure can.
Why is this necessary?
A typical camera sensor can’t handle extreme contrasts — like the bright sun and dark shadows in the same shot. As a result:
- Highlights may get blown out (completely white)
- Shadows may lose all detail (completely black)
In contrast, the human eye is dynamic — it constantly adjusts to different light levels, letting us see both shadows and highlights with clarity. HDR photography aims to mimic this ability.
A Glimpse into History
The quest to overcome the limitations of photographic technology isn’t new. In the mid-19th century, Gustave Le Gray, a visionary French photographer, faced the challenge of capturing seascapes where both the sky and sea were correctly exposed.
To address this, Le Gray ingeniously combined two negatives: one exposed for the sky and another for the sea. He then merged them to create a single, harmonious image. One of his most celebrated works, Brig upon the Water (1856), exemplifies this technique.

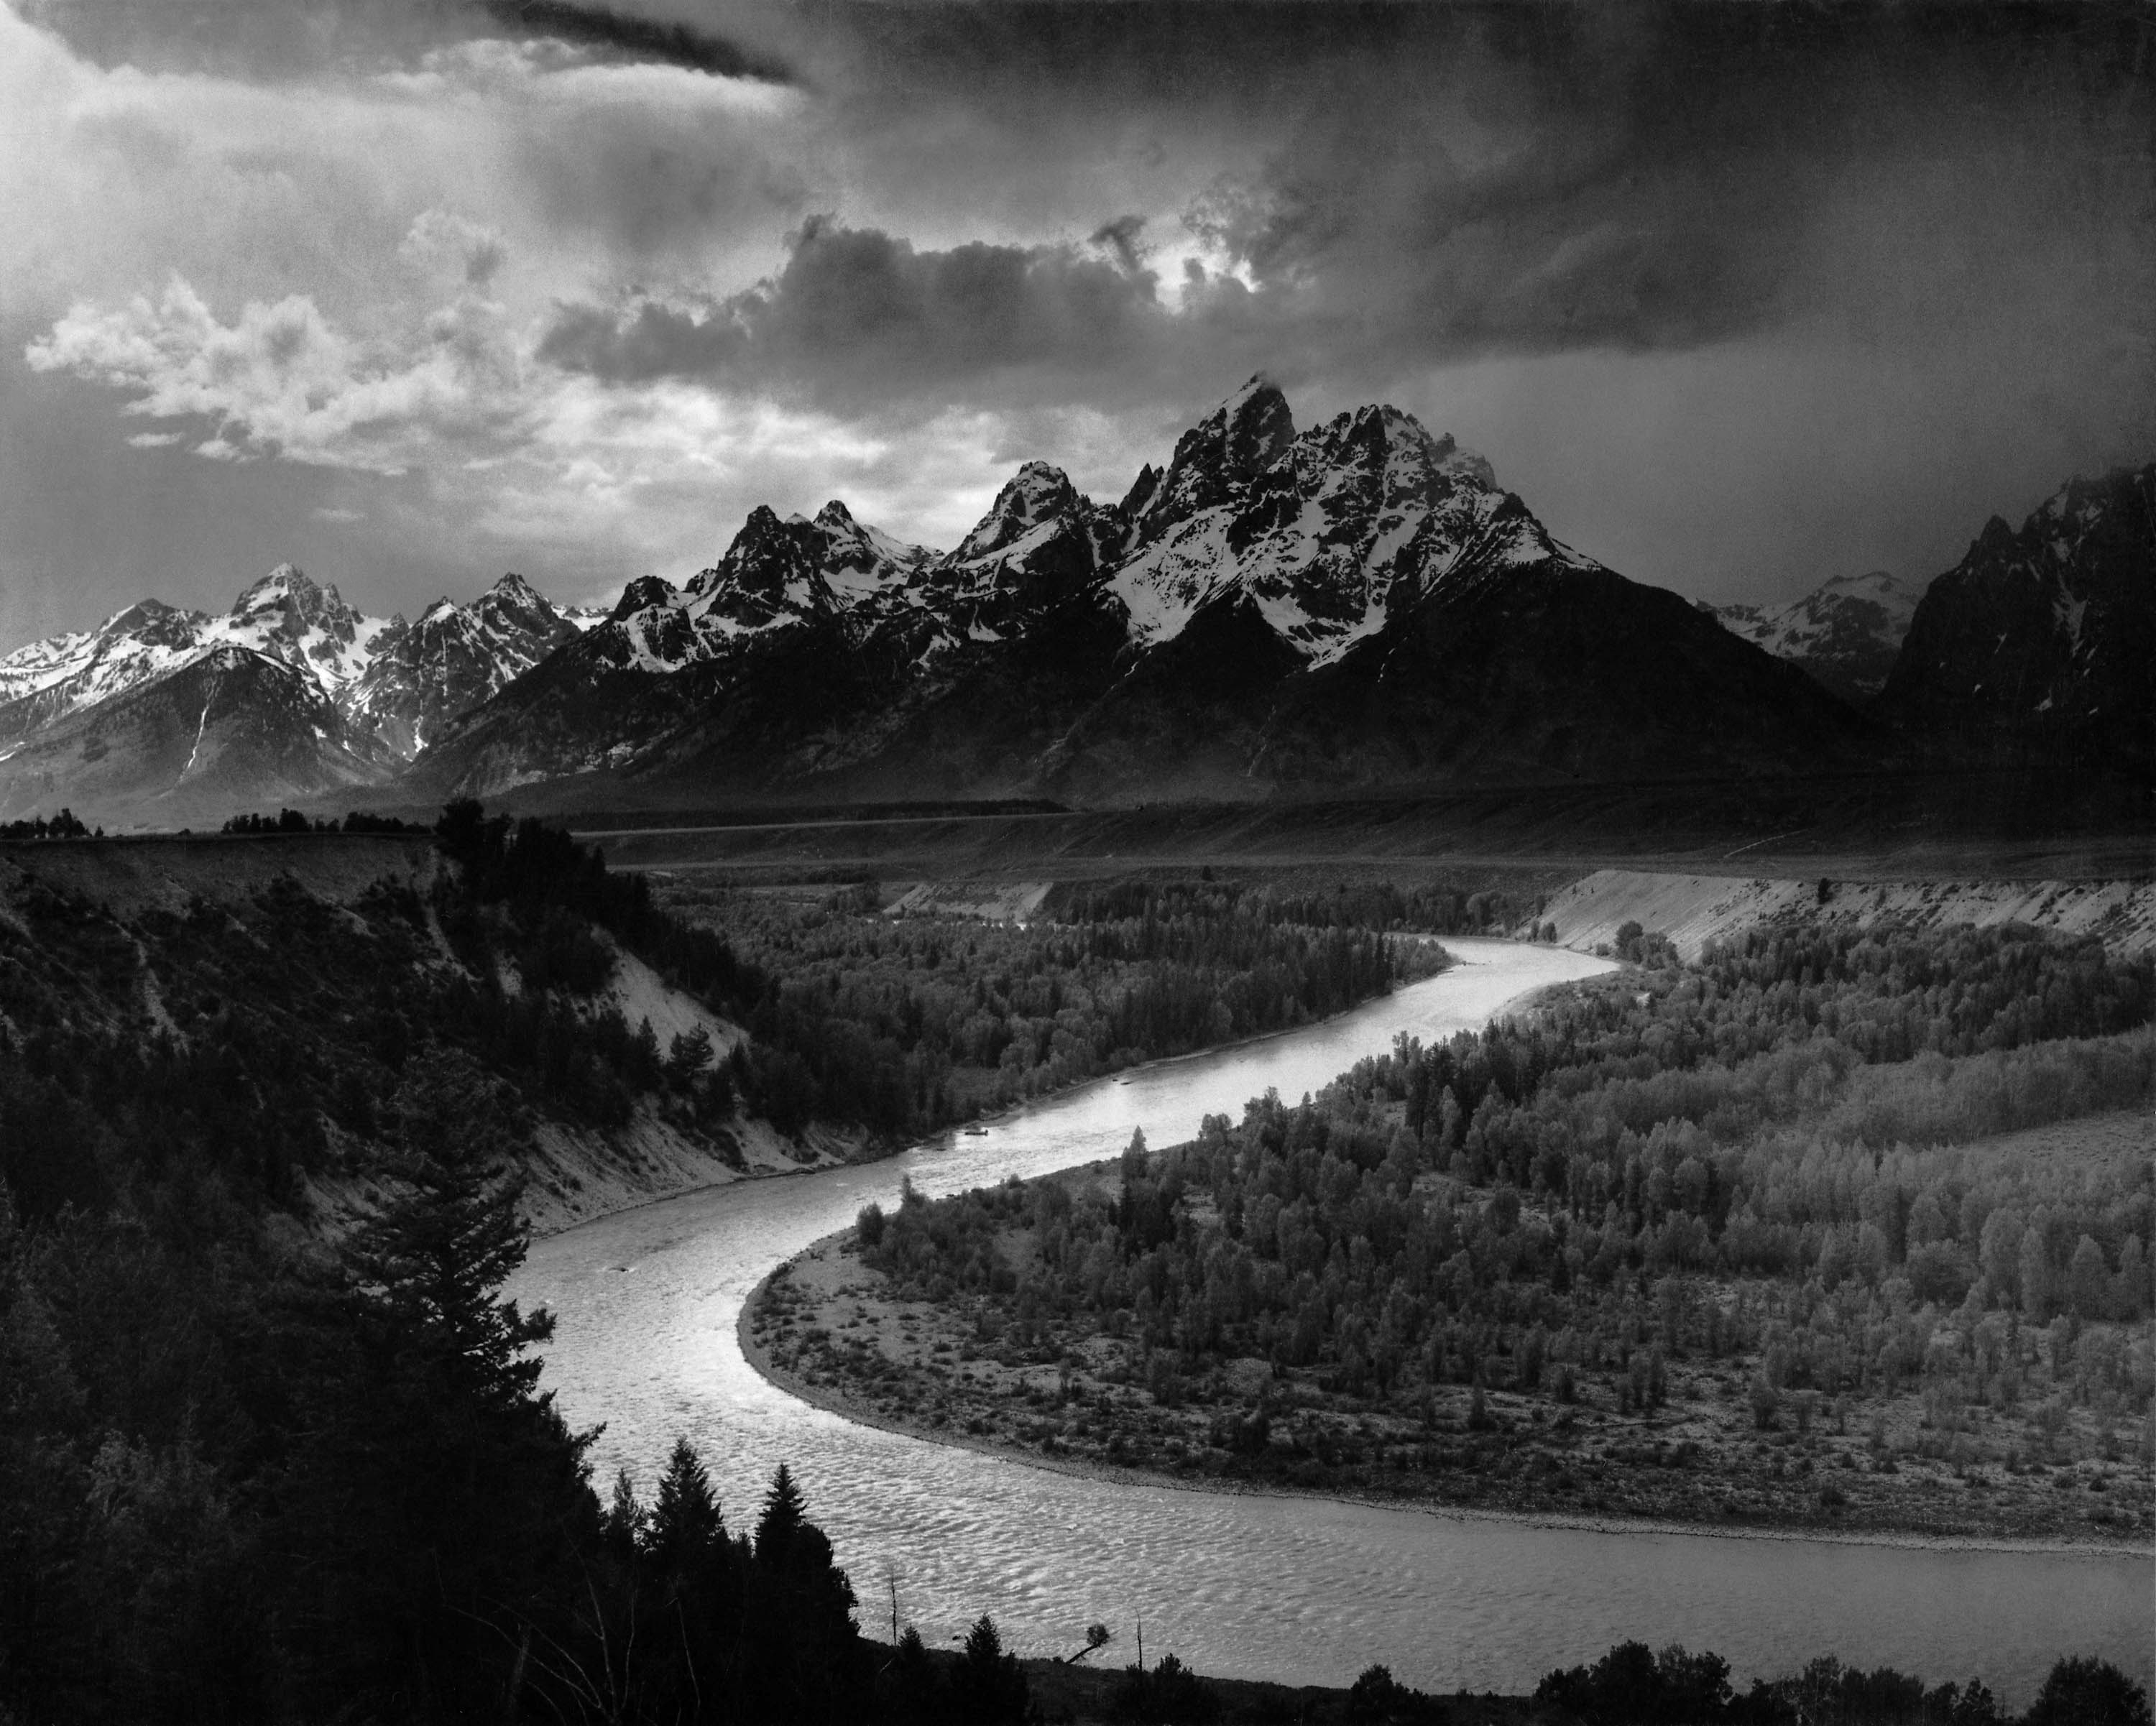
Fast forward to the 20th century, Ansel Adams, renowned for his breathtaking landscapes, employed darkroom techniques to enhance the tonal range of his photographs. His iconic image, The Tetons and the Snake River (1942), showcases his mastery in balancing light and shadow to reflect the scene’s grandeur.
How does HDR work?
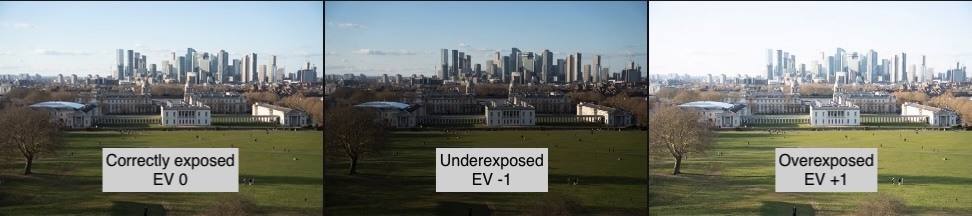
There are different techniques available for modern HDR photography, but typically it is achieved through a process called exposure bracketing, which involves:
- Taking multiple photos of the same scene at different exposure levels (underexposed, correctly exposed, and overexposed)
- Merging these images into one, so that details from both shadows and highlights are preserved
✅ Tip: Modern smartphones, like iPhones, apply HDR automatically in high-contrast scenes. This happens seamlessly — multiple exposures are taken and merged “behind the scenes” into a single photo.
How to capture HDR photos with cameras
Most mirrorless and DSLR cameras support two HDR modes:
- In-camera Auto HDR Mode
- The camera takes several exposures and merges them automatically
- Typically only JPEG output is supported (not RAW)
- Exposure Bracketing Mode
- The camera captures a set of exposures (e.g. -2, 0, +2 EV)
- You retain all files (often in RAW format)
- You later merge them using dedicated HDR software for more precise control
🔧 How to enable this (on Sony RX100VII camera as an example):
To bracket exposures, select
Drive Modeof the control wheel and select bracket shooting mode. You can then choose how many frames to capture and the EV step (e.g. ±1, ±2 stops). See help page for more details.For Auto HDR, go to
Menu → Camera Settings → DRO/Auto HDR → Auto HDRand select the desired settings. Keep in mind this function is only available when shooting in JPEG file format. See help page for more details.
When to Use HDR Photos
HDR isn’t just about dramatic, “gritty” images — in fact, some of the best HDR photos look completely natural. The power of HDR lies in its ability to expand the tonal range of a photo, helping you capture both shadow detail and highlights that would otherwise be lost.
The key is using HDR where it actually makes a difference. Here are the types of scenes where HDR truly shines:
✅ Ideal Situations for HDR
- Landscape photography. Wide-open scenes with bright skies and darker foregrounds often exceed the dynamic range of your camera. HDR helps retain cloud texture and shadow detail, all in one image.
- Cityscapes and architecture. Buildings often have both reflective surfaces and deep shadows. HDR balances these extremes, preserving texture without overexposing the sky.
- Interior photography. Taking a photo inside with bright windows? HDR allows you to reveal interior details while still showing the scene outside the window.
- Backlit or spotlighted subjects. When a subject is strongly backlit or illuminated by a spotlight (natural or artificial), HDR can recover facial features or detail without washing out the highlights.
- Small bright areas in dark surroundings. Like a single sunbeam breaking through trees, or a candlelit room with a bright window. These “bright spots” are where HDR helps avoid blown-out highlights.
Examples:
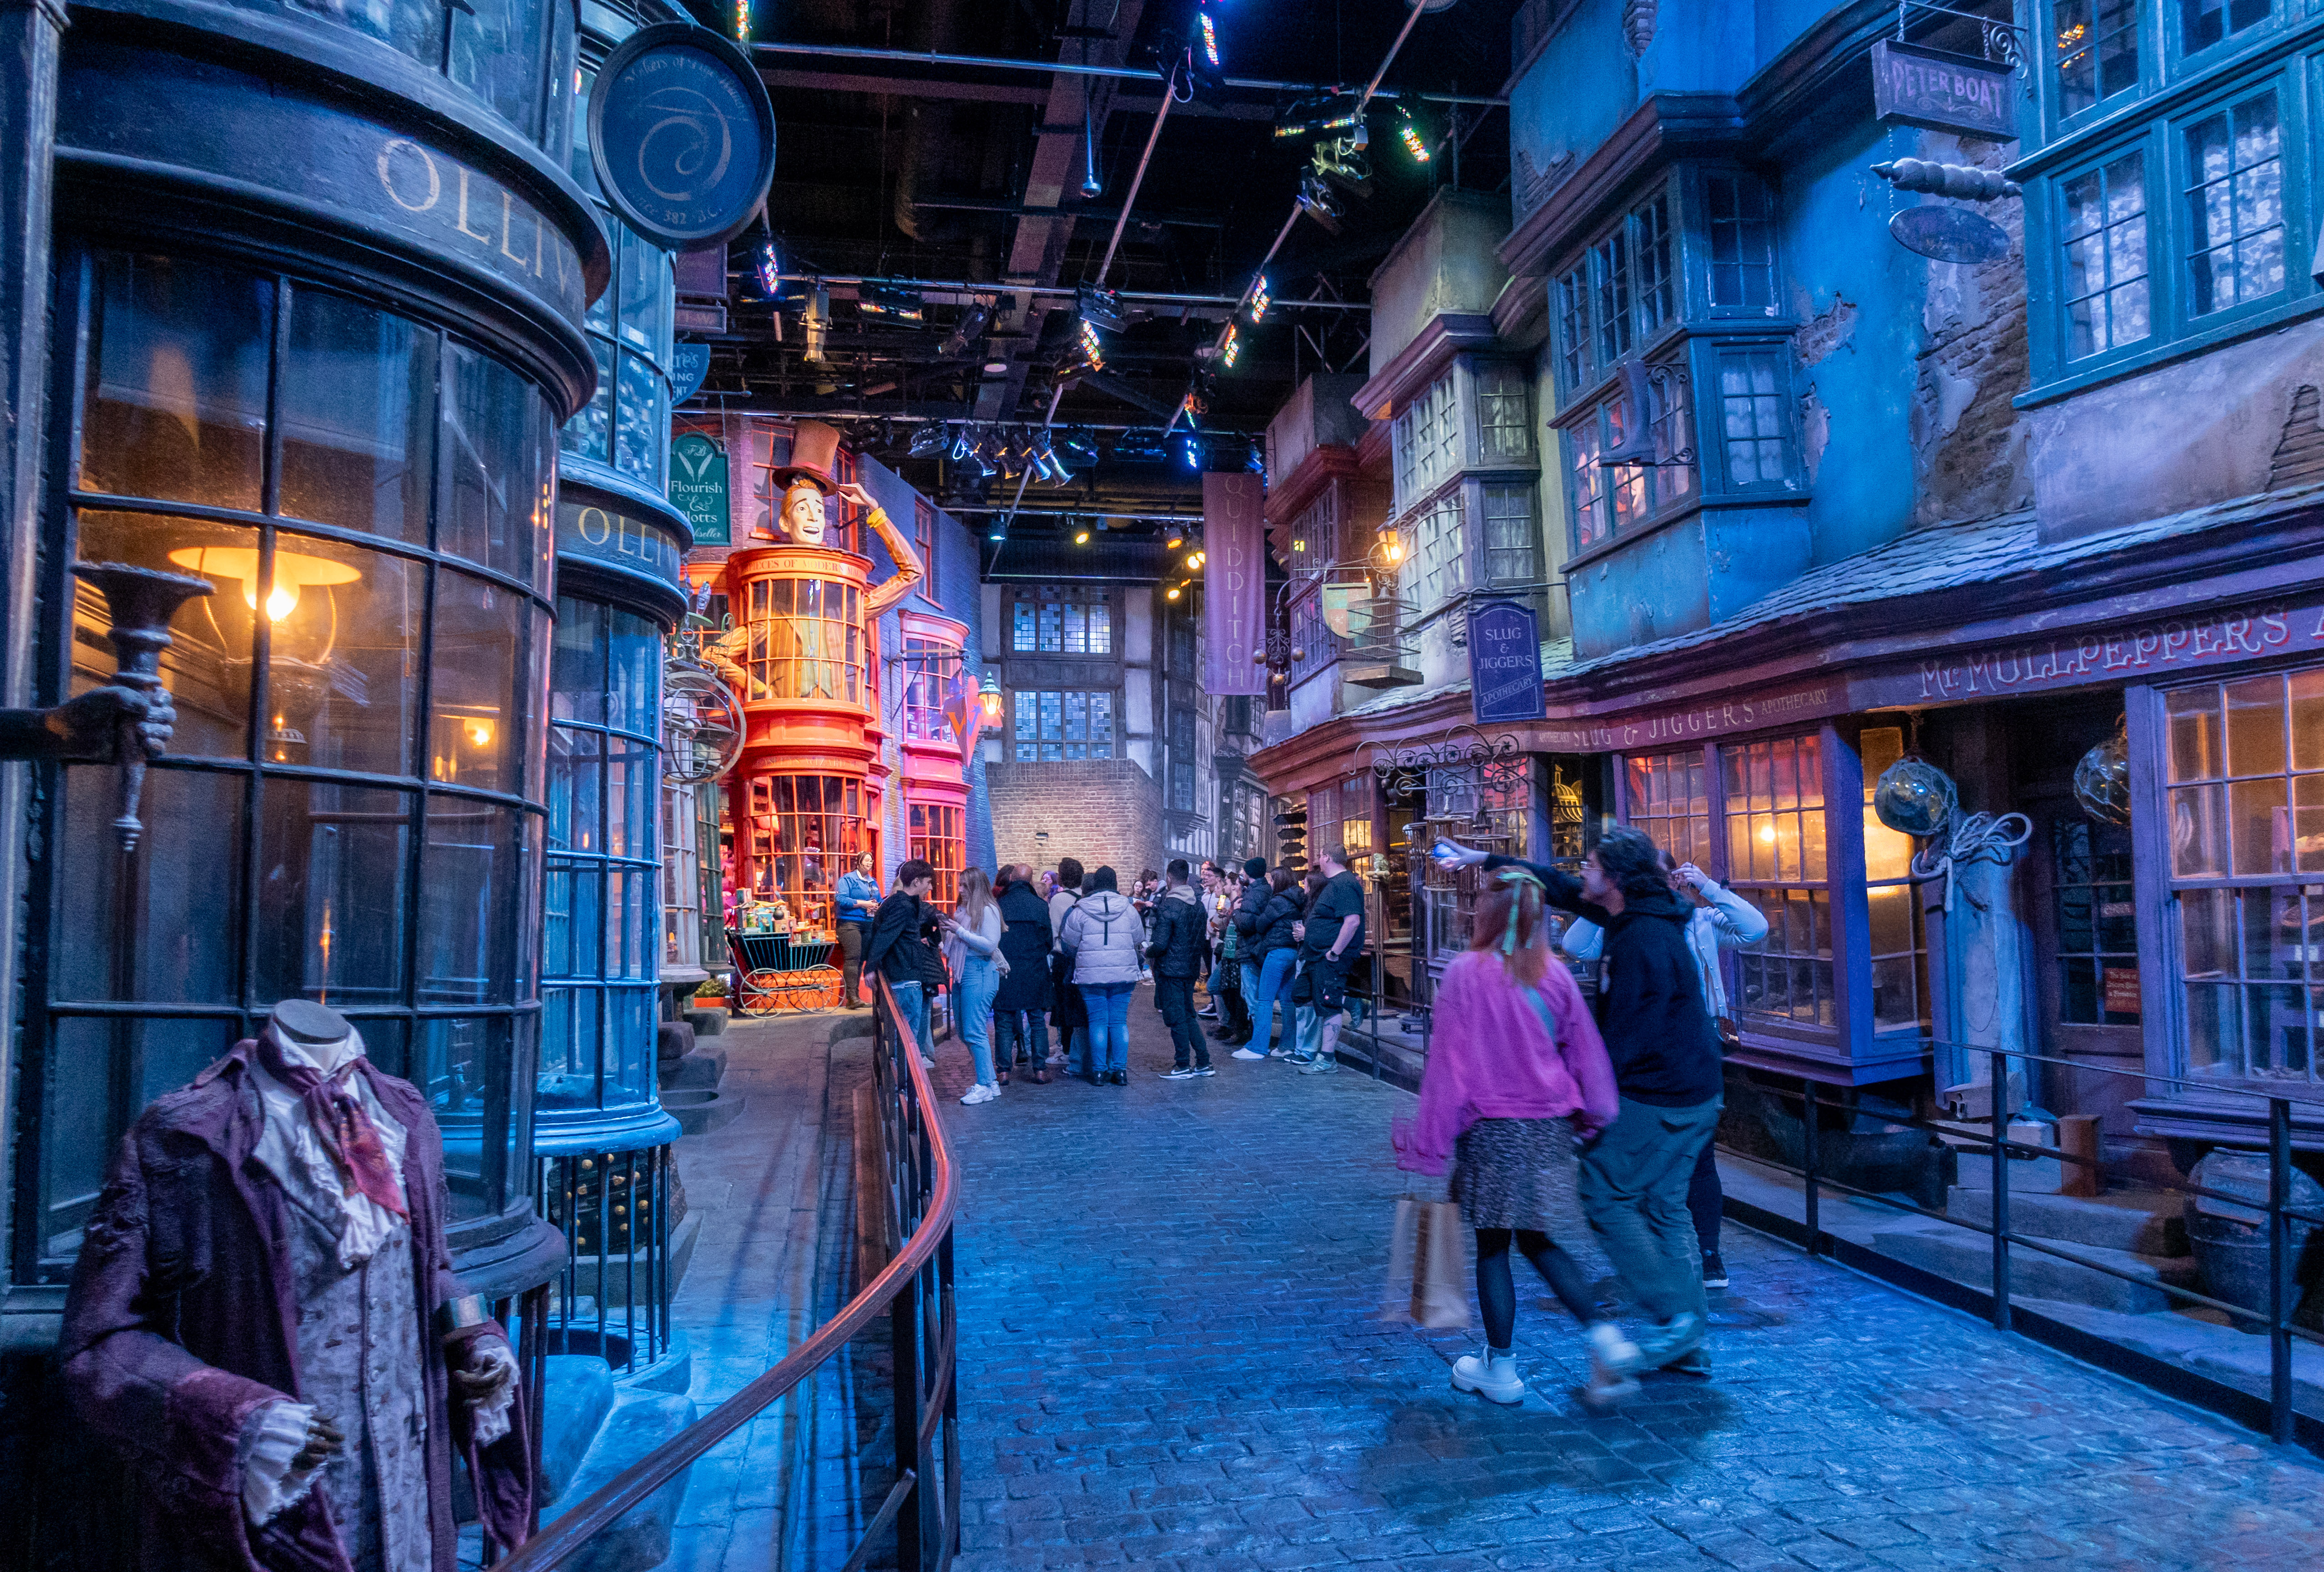
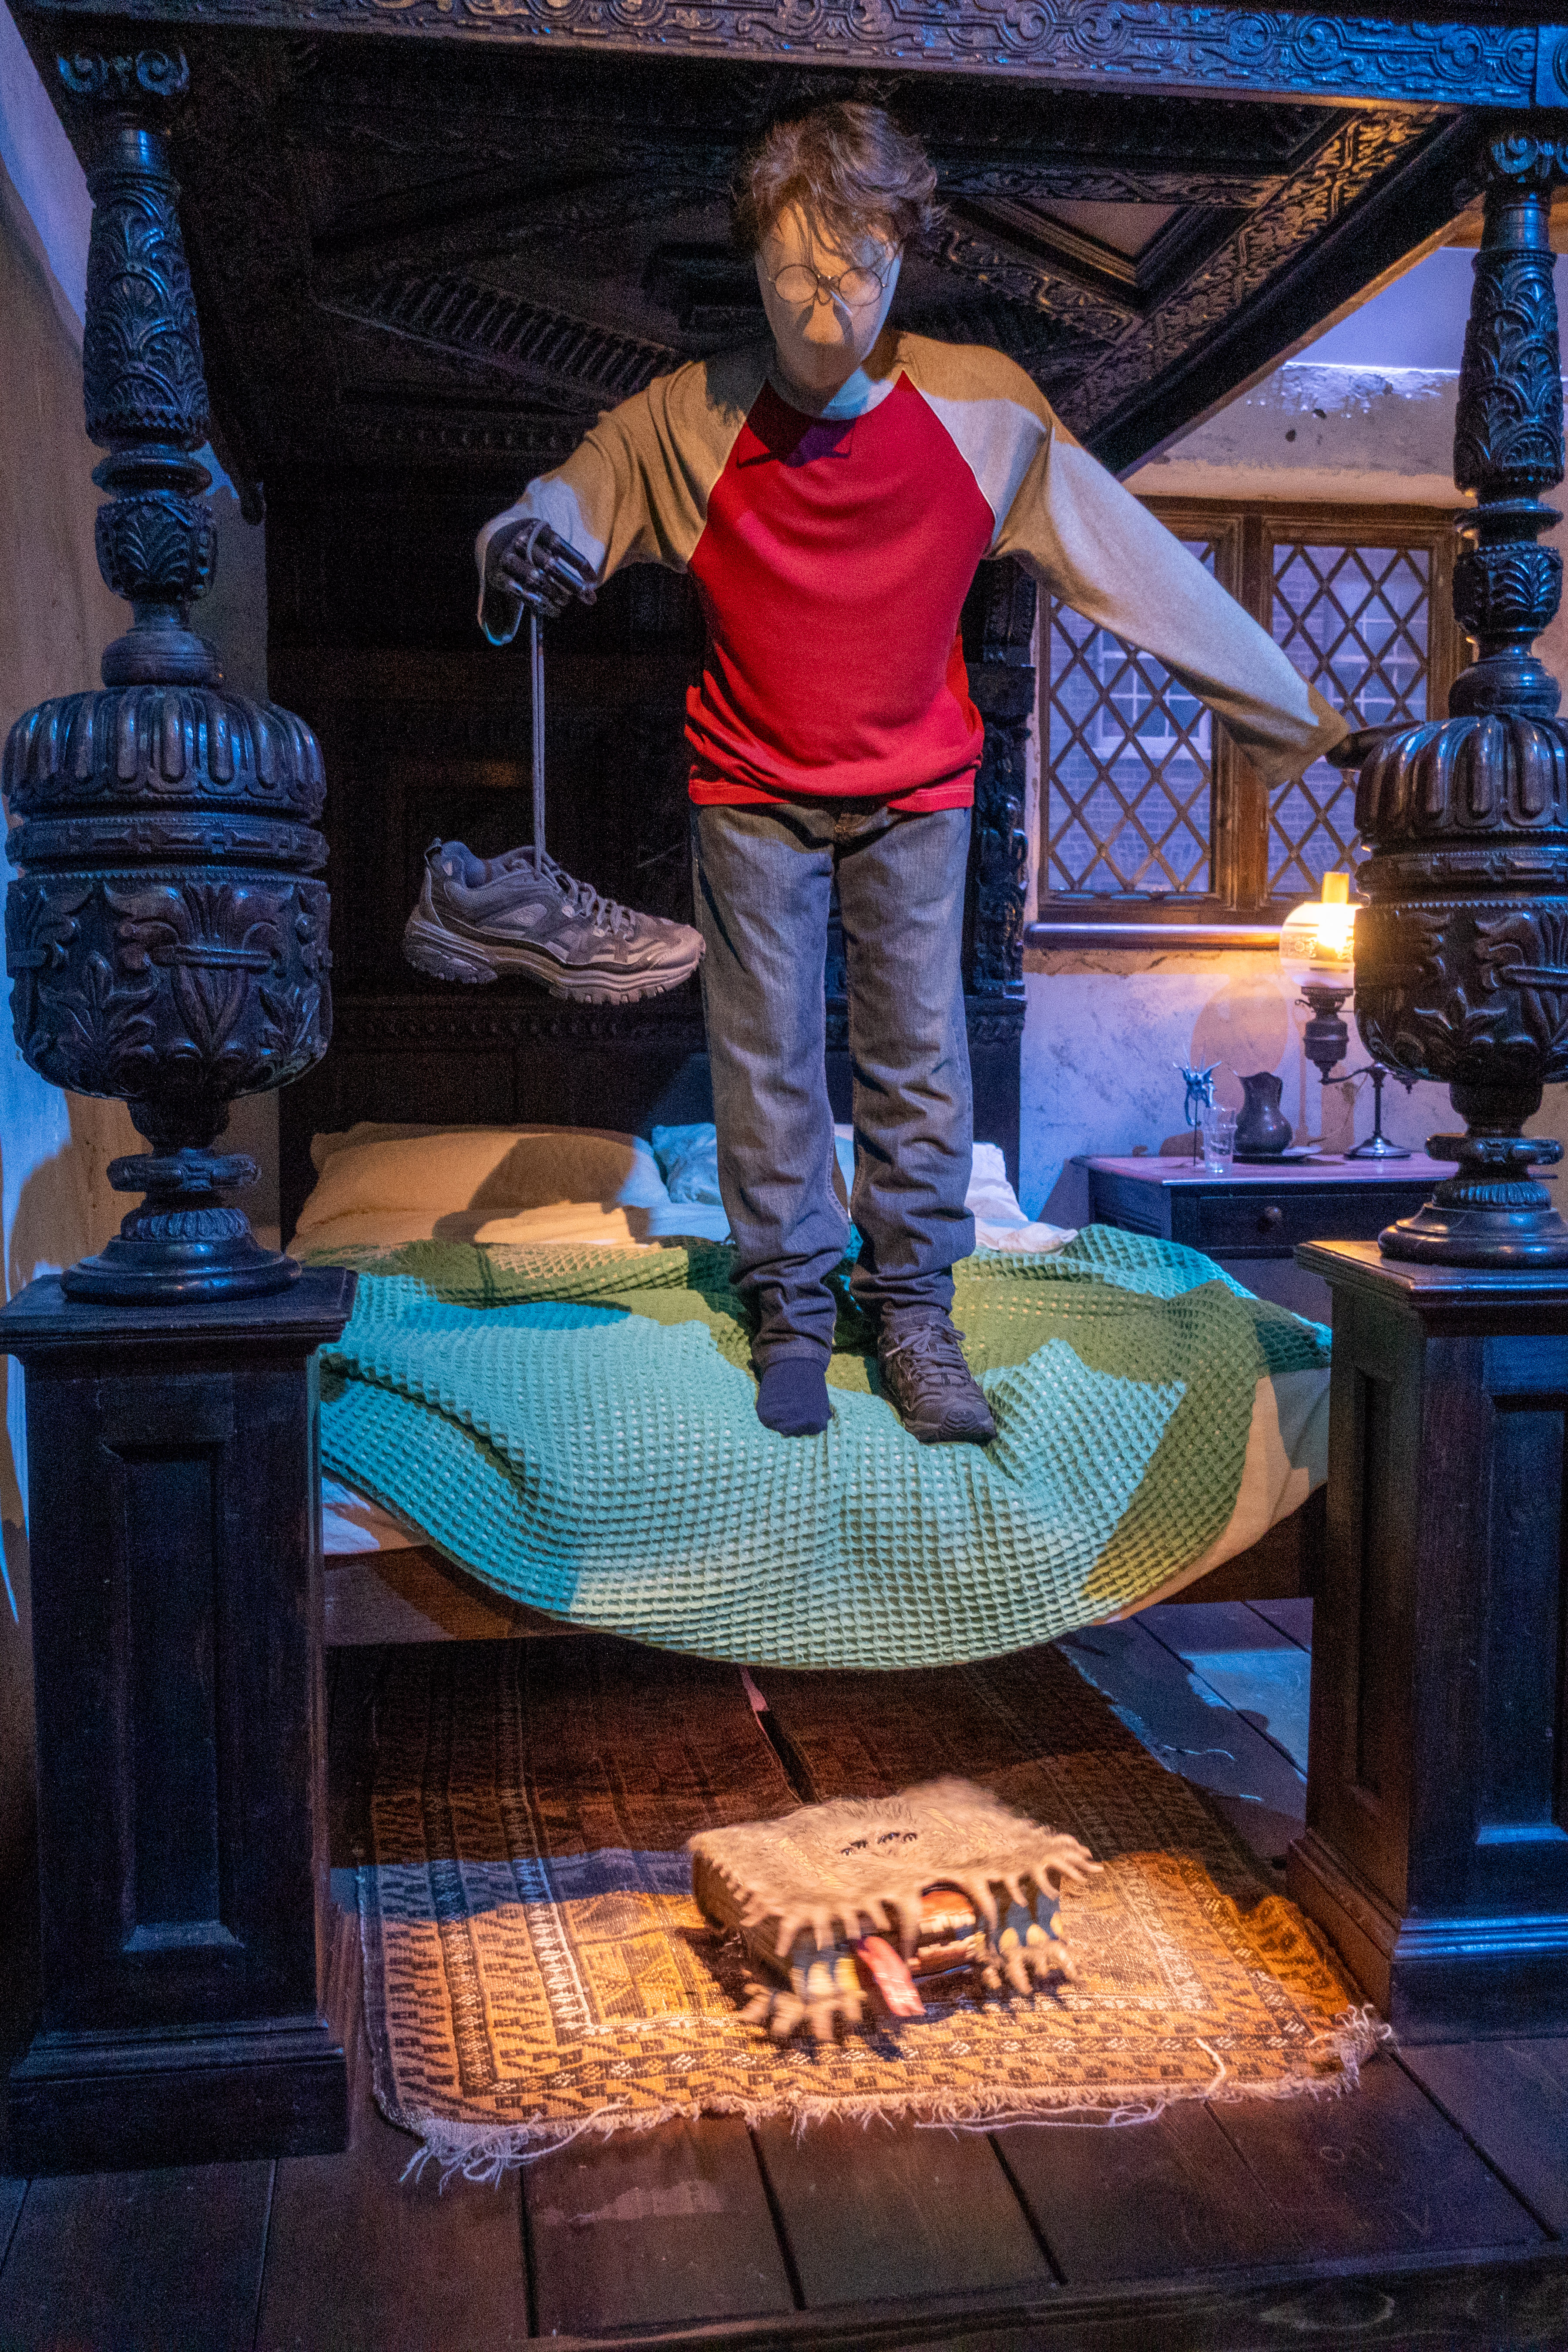
Below is an HDR photo taken at Warner Bros. Studio’s Harry Potter Tour. It captures the vibrant Weasleys’ Wizard Wheezes shop, but at the same time retains the details of the dim atmosphere of Diagon Alley.
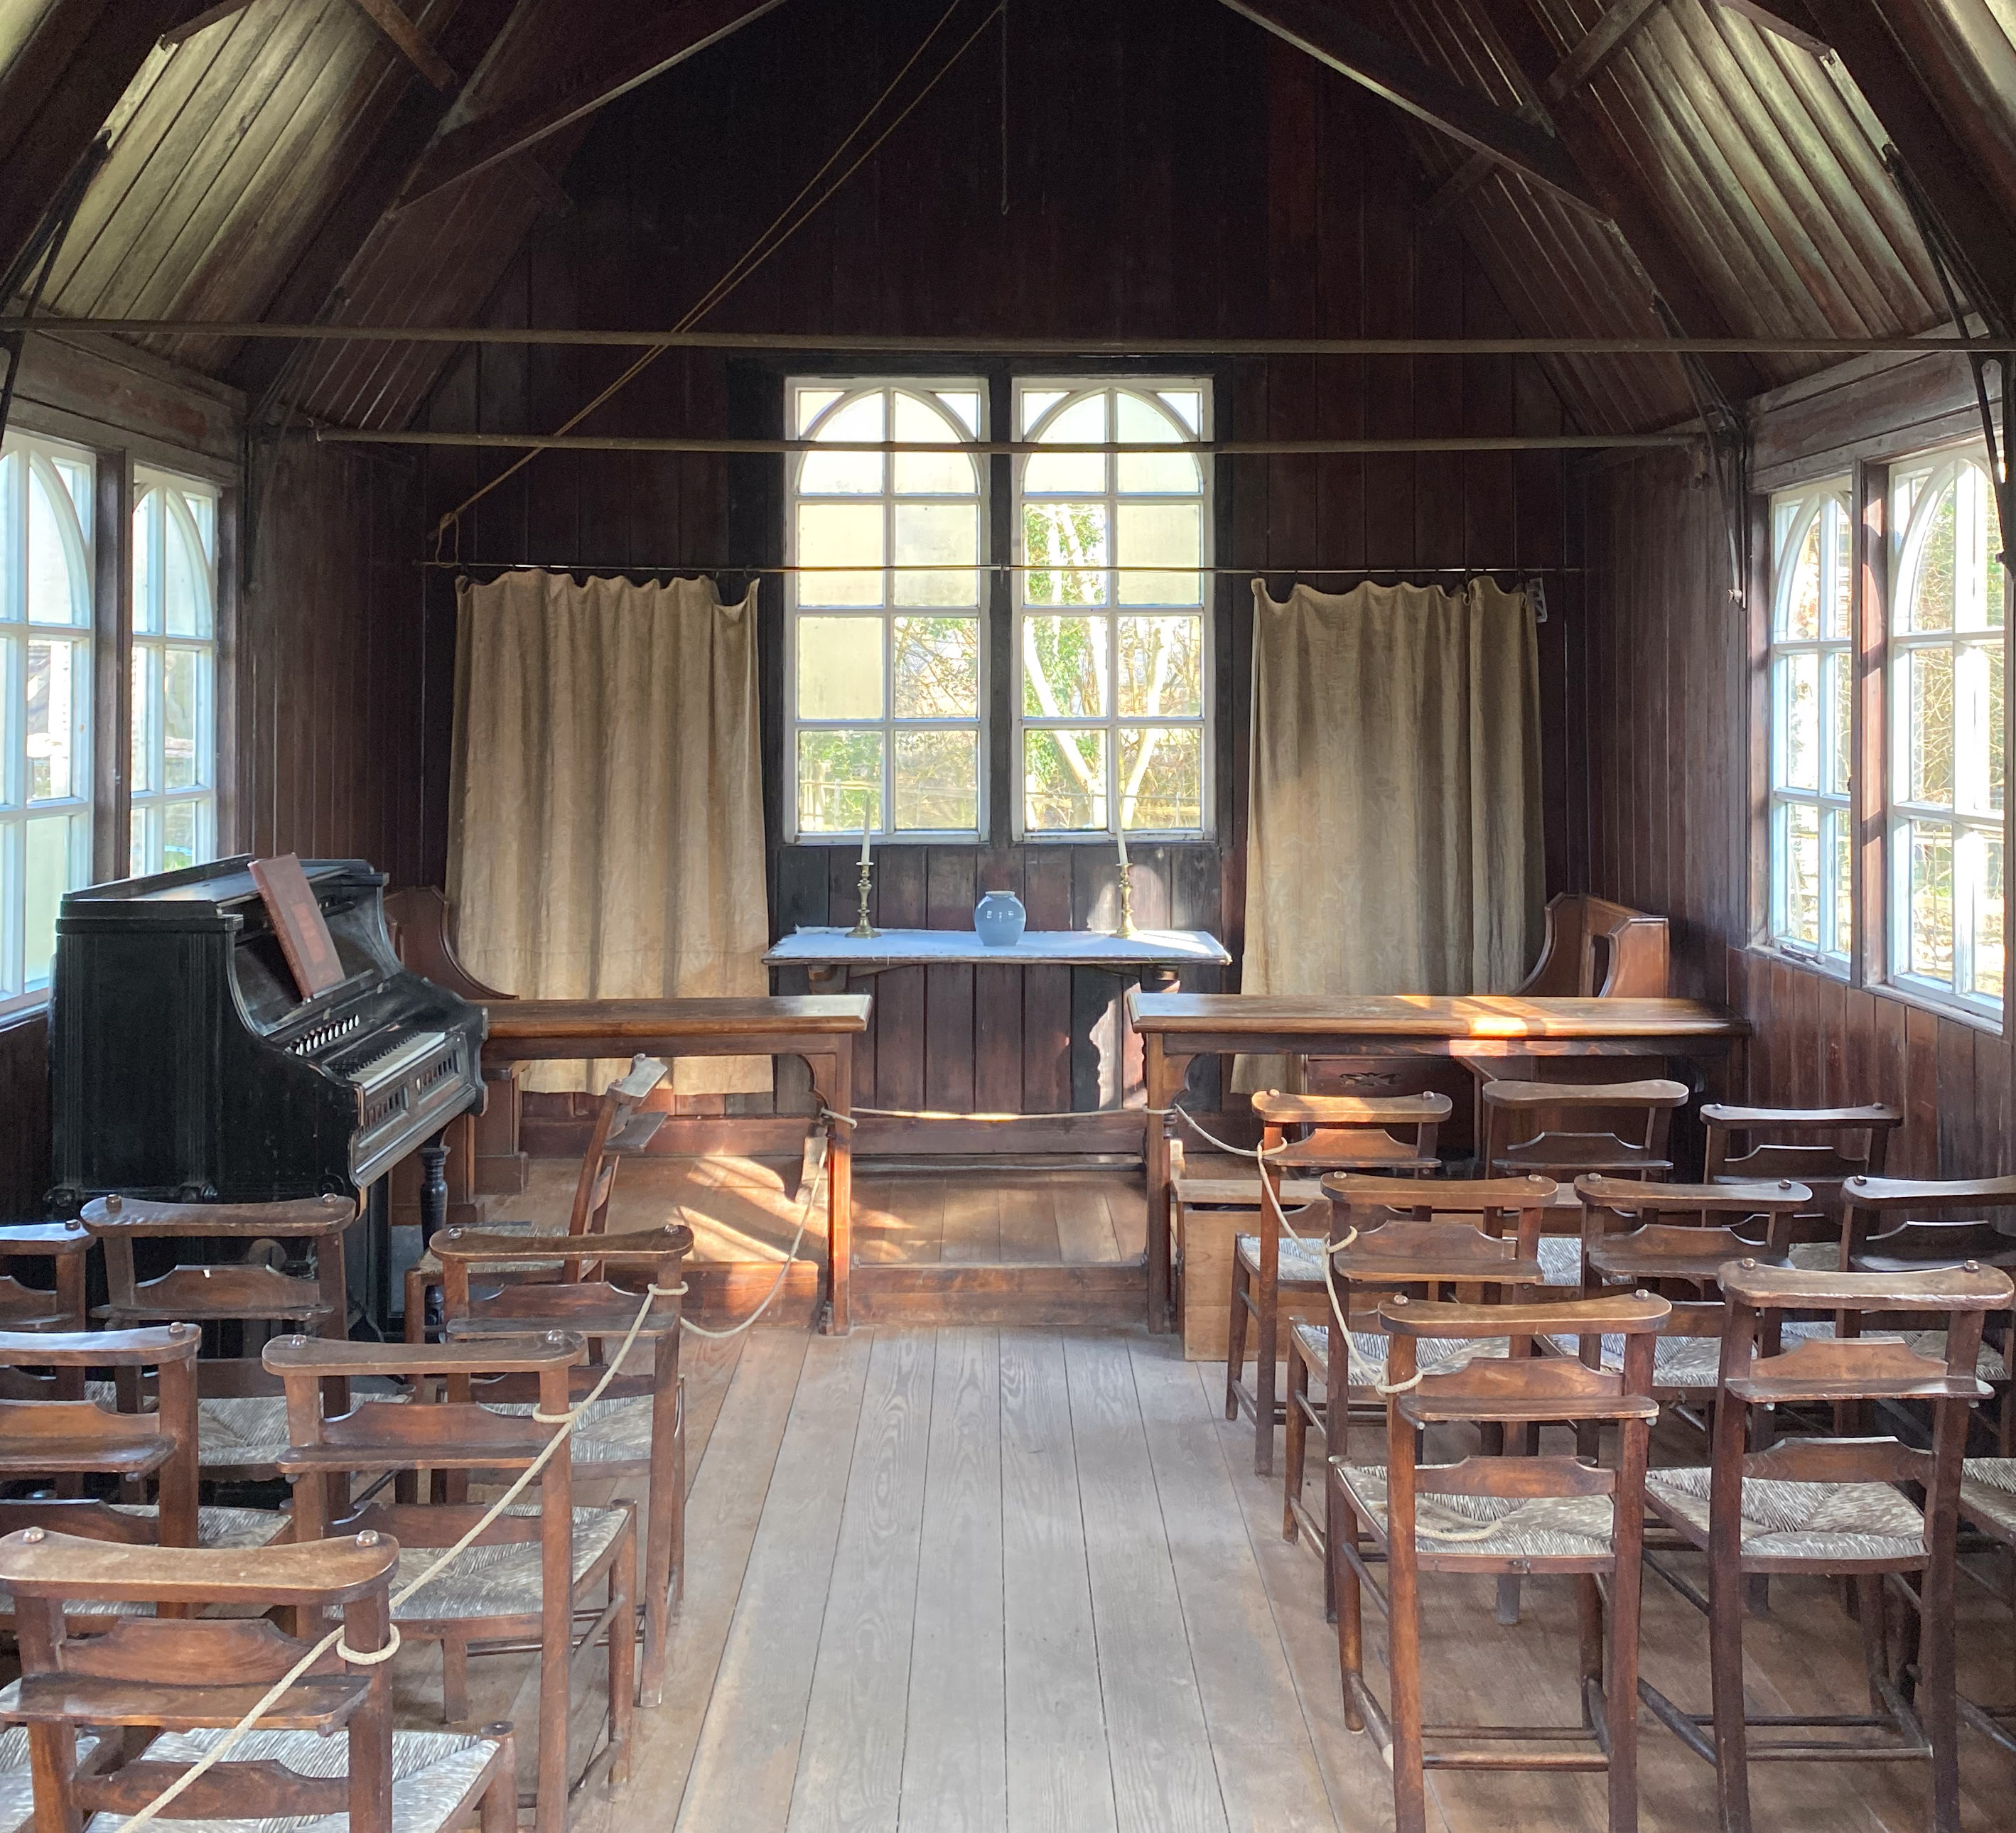
Another example is this photo of a church interior taken with an iPhone. The phone automatically applied HDR because of the high contrast between the bright windows and the dim interior.
❌ When Not to Use HDR
HDR isn’t always the right choice. Here are scenarios where it may work poorly:
- Scenes with movement. HDR combines multiple exposures. If anything moves between shots — people, cars, leaves — you may get ghosting (a double-exposure-like effect). While Lightroom offers a Deghosting option, it only works well for small movements. Larger movements will still ruin the merge.
- Low-contrast scenes. If your scene is evenly lit, HDR adds little benefit and can actually make your photo look flat or over-processed.
- Portraits. HDR can exaggerate skin texture and create an unnatural look. While some artistic portraits may use it creatively, it’s best avoided for natural skin tones.
Common Issues with HDR
Even when used in the right scenarios, HDR processing introduces its own challenges. These usually appear during tone mapping, which is the step where software compresses the wide dynamic range into something viewable on screens.
⚠️ Typical HDR Artifacts:
- Halos: Bright or dark fringes around edges, caused by too much local contrast.
- Ghosting: Semi-transparent overlaps from moving objects during bracketing.
- Noise: HDR can amplify noise in dark areas, especially from smaller sensors or high ISOs.
- Artificial look: Overdone tone mapping can lead to unnatural colors, exaggerated textures, and surreal microcontrast.
Many HDR tools — like Lightroom and Photomatix — offer controls to manage these issues, including ghost removal, contrast smoothing, and highlight/shadow compression.
Examples:
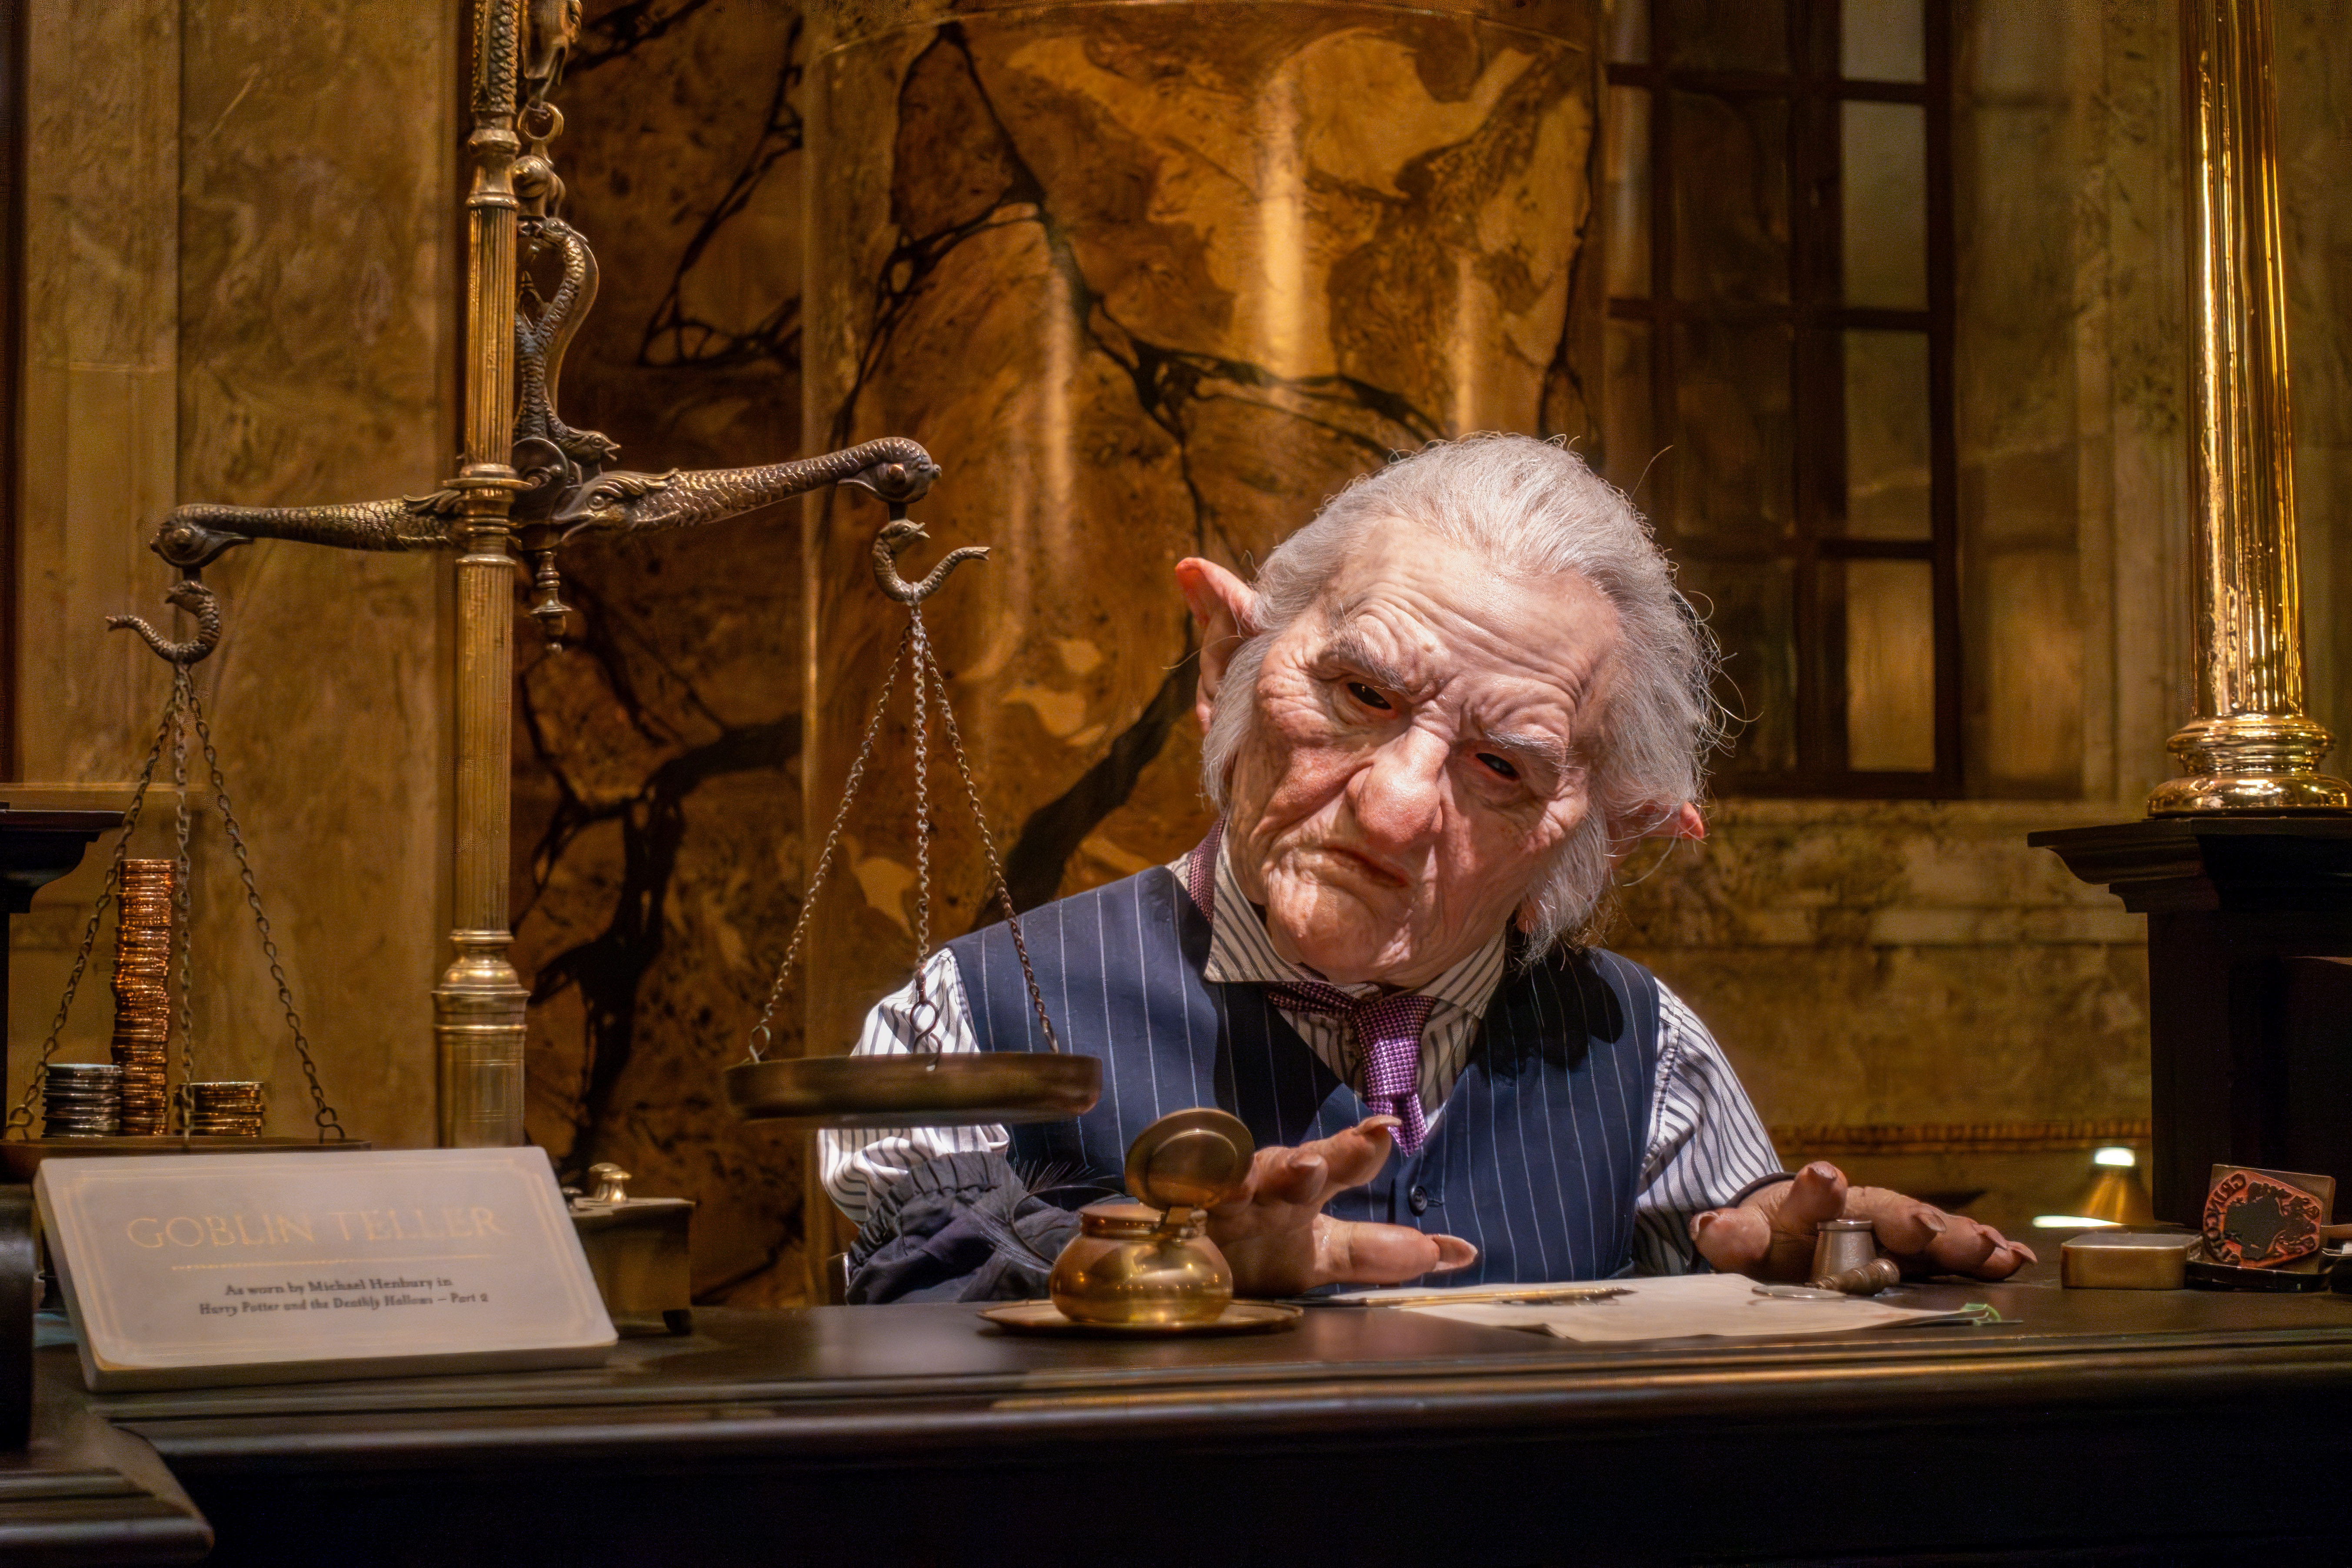
The photo below, captured with a point-and-shoot camera and processed as HDR, successfully recovers details on the brightly lit Goblin’s face. However, it appears flat, lacking clear separation between the foreground and background.
Here’s another photo from the same camera. There is noise in darker areas that became more visible after the HDR merge.
📸 Tip: When in Doubt, Bracket
It’s not always obvious whether HDR will improve your photo. A good practice is to shoot with exposure bracketing when you’re unsure. This gives you the option to merge later on your computer — and compare results — without missing the shot.
Merging HDR Photos in Adobe Lightroom
To create HDR images, you’ll need to merge multiple bracketed exposures into a single photo. Several tools are available for this purpose, including Photomatix, LR/Enfuse, and others. However, Adobe Lightroom provides a built-in and relatively streamlined way to do this — especially if you’re already using it as part of your workflow.
Using Lightroom (Cloud Version)
Personally, I use the cloud-based version of Lightroom (not Lightroom Classic). It comes with 1TB of cloud storage, making my photo library accessible from any device — including the desktop app, iPad app, and even the web. All edits and metadata are automatically synchronized, allowing me to start editing on my computer and seamlessly continue on my iPad while traveling.
The actual HDR merging process in Lightroom is fairly manual:
- Identify Exposure Bracketed Groups. I don’t use exposure bracketing for every shot — only when the scene has high dynamic range and could benefit from HDR. As a result, my photo library is a mix of single exposures and bracketed sequences. To find bracketed groups, I visually scan for similar-looking photos taken seconds apart, and use the Info panel to confirm that their capture times are very close.
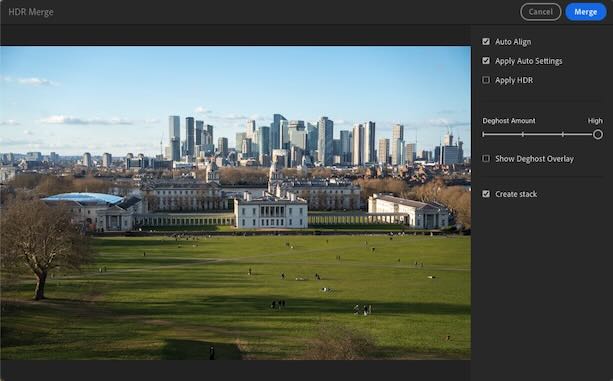
- Merge to HDR. Once a group is identified, I select the images and choose Photo Merge → HDR (or press
Ctrl + H). Lightroom then displays the HDR Merge dialog, where I can preview the result and adjust settings like Deghost Amount (used to correct motion between frames). Clicking Merge adds the task to a background queue, and Lightroom creates a new DNG file for the merged HDR image.
This process works well, but has several limitations:
- Manual group detection. Lightroom (cloud version) does not automatically detect exposure brackets. There’s no way to view exposure compensation values, so I must rely on visual cues and timestamps.
- No batch merging. Each group must be manually selected and merged. This becomes tedious when dealing with large sets of bracketed images, especially after a trip.
- Bracket count is not detected. Lightroom doesn’t indicate how many exposures are in each bracketed group (e.g., 3, 5, or 7), so you need to remember or check manually.
Automating HDR Merge in Lightroom Classic
If you’re using Lightroom Classic, there are more advanced options for automating the process.
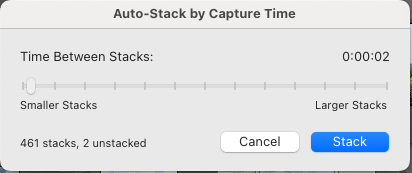
One useful feature is Auto-Stack by Capture Time, which groups photos shot within a specified time interval. Since exposure-bracketed images are taken in rapid succession, this can help group them correctly.
You can access this via: Photo → Stacking → Auto-Stack by Capture Time…
This opens a dialog where you can specify the time gap (e.g., 2 seconds) to define stack boundaries. In theory, this should group all bracketed sequences automatically. In practice, however, I’ve found this method can be unreliable - especially when multiple sequences were shot close together or when the number of exposures per bracket varies.
💡 Tip: Some recommend leaving small gaps between shooting brackets to help Lightroom auto-stack more reliably. However, this isn’t always practical when you’re shooting on location, and doesn’t help if you’re working with existing photos.
Once the stacks are created, you can select all stacks and apply the HDR Merge command in batch mode. Lightroom Classic will process each stack as a separate HDR job. This allows you to queue up multiple merges and step away from your computer while they complete.
⚠️ Note: This batch merging feature is not available in the cloud-based Lightroom. If you select multiple bracketed groups and run HDR Merge there, only the last selected group will be merged.
A good walkthrough of this workflow is available in the video: 📺 “Automate HDR Image Merging in Adobe Lightroom | Automate Your Exposure Bracketing Photo Workflow”
Automating HDR Merging with a Custom Lightroom Plugin
To address the limitations in Lightroom’s manual HDR merging workflow, I developed a small tool: the Lightroom Auto Stacker Plugin. As the name suggests, the plugin automates the first crucial step - detecting groups of exposure-bracketed photos and stacking them automatically.
Unlike Lightroom’s built-in Auto-Stack by Capture Time feature, which relies on time gaps between shots, my plugin analyzes EXIF metadata embedded in each image file to group photos that were taken as part of an exposure bracket sequence. I found this method to be more reliable, because it works even when timing between shots is inconsistent.
A Quick Introduction to EXIF Metadata
EXIF (Exchangeable Image File Format) data is metadata stored within image files that describes how and when a photo was taken. It includes standard tags such as exposure time, aperture, ISO, and timestamp, along with many camera-specific details.
To inspect EXIF metadata, I use ExifTool — a powerful command-line utility that extracts metadata from a wide range of image formats.
Analyzing Metadata from a Sony Camera
Let’s take a look at an example of four RAW files shot with a Sony camera:
| SourceFile | DSC02107.ARW | DSC02108.ARW | DSC02109.ARW | DSC02110.ARW |
|---|---|---|---|---|
| EXIF:DateTimeOriginal | 2025:03:15 17:35:41 | 2025:03:15 17:36:56 | 2025:03:15 17:36:56 | 2025:03:15 17:36:56 |
| EXIF:ExposureMode | 0 | 2 | 2 | 2 |
| EXIF:ExposureCompensation | 0.3 | 0.3 | -0.7 | 1.3 |
| MakerNotes:ReleaseMode | 0 | 5 | 5 | 5 |
| MakerNotes:SequenceImageNumber | 1 | 1 | 2 | 3 |
| MakerNotes:SequenceLength | 1 | 3 | 3 | 3 |
DSC02107.ARWwas taken as a single exposure.DSC02108.ARW–DSC02110.ARWform a 3-image exposure-bracketed sequence.
Key Metadata Fields Explained
Here’s how the plugin uses specific EXIF and MakerNotes fields to detect exposure-bracketed groups:
- EXIF:ExposureMode. This helps differentiate between standard and special shooting modes.
- 0 = Auto Exposure
- 2 = Auto Bracket
- MakerNotes:ReleaseMode (Sony-specific). When the value is 5, it indicates that the shot is part of a bracketed sequence.
- 0 = Normal
- 5 = Exposure Bracketing
- MakerNotes:SequenceLength and MakerNotes:SequenceImageNumber. These indicate the total number of images in the sequence and the position of each image within it.
- For a single photo: SequenceLength = 1
- For a 3-image bracket: SequenceLength = 3, with SequenceImageNumber = 1, 2, 3
- EXIF:ExposureCompensation. In bracketed sequences, the compensation changes per shot. For example, with a base exposure compensation of 0.3 and a ±1.0 EV bracket:
- First image: 0.3 (base)
- Second image: -0.7 (0.3 - 1.0)
- Third image: 1.3 (0.3 + 1.0)
These patterns are used by the plugin to reliably identify bracketed groups - something that is not feasible using timestamps alone.
📌 Note: Standard EXIF fields (like
EXIF:ExposureMode) are generally consistent across camera brands. However,MakerNotesfields (such asReleaseModeandSequenceLength) are proprietary and vary between manufacturers. At present, the plugin supports Sony cameras, but I plan to expand it to support additional camera brands. You can find the complete list of Sony-specific tags used by ExifTool here.
Plugin Architecture
The solution is structured into two key components:
- Python Script. This script analyzes the EXIF metadata of all imported files and identifies exposure-bracketed groups. It outputs a group description file, which lists image sequences that should be stacked together.
- Lightroom Plugin. This plugin reads the group description file and uses the Lightroom SDK to automatically create stacks inside Lightroom. Once stacked, these groups can be batch-merged into HDR photos using Lightroom’s built-in merge functionality.
The Automated Process for Merging HDR Photos in Adobe Lightroom
This section outlines the full workflow for using the plugin to automate HDR merging in Adobe Lightroom Classic.
🧩 Installation Instructions
Python Script:
- Install Python (if not already installed).
- Clone the Repository:
git clone https://github.com/anton-dergunov/lightroom-hdr-auto-stack.git cd lightroom-hdr-auto-stack - Install Dependencies:
pip install -r requirements.txt
Lightroom Plugin:
- Launch Adobe Lightroom Classic. (Note: The non-Classic version does not have plugin support as of now.)
- Open Plug-in Manager:
- Navigate to File → Plug-in Manager.
- Add the Plugin:
- Click Add and select the
auto-stacker.lrpluginfolder. - Enable the plugin once added.
- Click Add and select the
⚙️ Usage Instructions
- Detect Bracketed Images. Run the Python script to analyze your photo directory and generate a group description file based on detected exposure brackets.
python group_sony_bracketed_photos.py --input /path/to/photos --output groups.txtYou can also specify a different file extension with
--extension(default is ARW). - Import and Auto-Stack in Lightroom.
- In Lightroom Classic, navigate to Library → Plug-in Extras → Import and Auto Stack Photos.
- Provide the path to the generated
groups.txtfile. - The plugin will import the images and automatically stack them based on detected brackets.
- Batch Create HDR Images.
- Open the folder with the imported stacks in Lightroom.
- Collapse all stacks: Photo → Stacking → Collapse All Stacks.
- Select all stacks: Edit → Select All.
- Begin the merge: Photo → Photo Merge → HDR… Lightroom will queue a batch merge for each stack using your last-used HDR merge settings (such as Deghosting). Note that this step will take some time depending on the number of stacks.
- Access and Export HDR Images.
- If you’re working in Lightroom Classic, you can continue editing directly. To quickly locate HDR files, filter the Library view by the
.dngextension. - If you prefer the cloud-based version of Lightroom, you can export the HDR images. They’re saved in the same folder as the originals and typically named using the first file’s name followed by
-HDR.dng.
- If you’re working in Lightroom Classic, you can continue editing directly. To quickly locate HDR files, filter the Library view by the
📸 Real-World Workflow
When I return from a photo walk, I use this plugin to automatically detect and merge all HDR image sets. While the process is largely hands-free, it does take a few minutes to run — especially for larger shoots. Once HDR images are generated, I import both the original files and the HDR files into Lightroom Cloud storage (which allows to sync across devices).
This pre-processing step has become a useful part of my workflow. It allows me to review all HDR and original exposures side-by-side during the culling phase, which I can do either on my desktop or directly on my iPad. HDR isn’t always the better version. Sometimes I keep the HDR, sometimes I prefer one of the original exposures. Having all options upfront saves time and helps me make a better and quicker decision.
If I notice artifacts like ghosting or poor tone mapping, I can always manually re-merge specific brackets using different Lightroom settings. But having most of the work done automatically up front is a huge time saver.
Final Thoughts
HDR photography can elevate your images — when used thoughtfully. But the merging process can quickly become a bottleneck, especially when dealing with dozens or hundreds of exposures. This plugin is designed to streamline that step, using camera metadata to detect exposure brackets with higher reliability than timestamp-based methods.
By automating the HDR merge workflow, this tool helps me focus more on the creative side of photography, rather than on the repetitive tasks. I hope it can do the same for you.
You can find the source code, instructions, and more details here:
👉 Lightroom Auto Stacker Plugin
If you find it useful, I’d love to hear your experience, and any suggestions for improvement or wider camera support.